Saturday, 25 May 2013

Daisy Daisy...

....a few years ago our very close friends said... 'I do'! 
There were daisies aplenty at their wedding...
and a couple of daisy coasters for their anniversary!


The pattern for one of them came from here 
variation 5 of in bloom
and one was a miscounted version!


This was the first pattern I tried (in bloom), which I think we will keep.


The book gives oodles of patterns and 5 extra for each design as further inspiration-
its a treasure trove of information and there'll be many more featuring here!


The daisies were made with stash cotton
weighing in at a blooming 37g
Giving a total for May of  185+10+37=232g
and  1157g for the year so far!


Happy Anniversary L&D xx

Wednesday, 22 May 2013

Dragonfly and Flutterby

The friend who commissioned Project Dragonfly has a birthday this week.
I devised a small dragonfly for her card..


It was made in two parts


wings in a magic circle then body.


It can be detached from the card to hover freely!

I had the idea for the magic circle wings after hooking this beautifully simple butterfly


Only 10g of stash busted including Dragonfly prototype...but the butterfly is so quick I'm sure some more will wing their way off the hook!


Thursday, 9 May 2013

Outer Space!

Having created some curiosity with the bumps in the last post - here is the next stage in the process!
My two friends, and a colleague of one of theirs, are striding out in London on Saturday night to walk the  MoonWalk.
They asked if I would help to titivate their bras, and with the theme of Outer Space we came up with a friendly alien design!

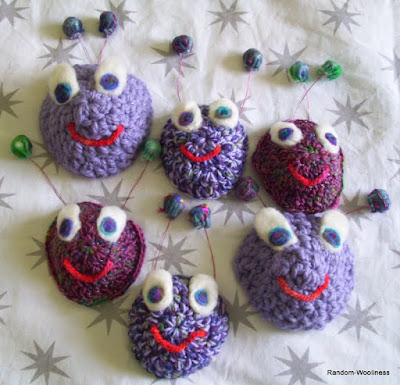
So.... meet the friendly aliens


Penny Brohn Cancer Care has a purple theme so all the aliens have followed suit!


This is a super chunky purple yarn with a shiny thread added whilst hooking. The hook was way smaller than suggested so the shape just organically happened!


All the aliens have needlfelted facial features!


This couple of soft aliens have two strands of purpley pink 100% wool, (one plain, one with a few greeny bits) and some of the shiny thread. 
All the faces are circles of crochet with various increases during rows to make them three dimensional!


It was amazing how much purple wool there was in my stash - I didn't think I was a purpley person!
Total bust-ed: 185g


Two purple acrylics and  a metallic purple made up the other alien faces. The metallic was the only yarn bought for the project.

The pairs of antennae are at this stage interchangeable.
They are made from:


a circular (well mostly!) piece of wet felt, with surface texture or design added, and a doubled piece of floristry wire sewn into the middle of the circle. 
The sharp ends were concealed with a scrap of yarn. 
Running stitch, sewn round, near the outer edge, was pulled gently before the floristry wire was bent at 90 degrees just below its loop. 
A small wodge of toy stuffing was prodded into the gap just before it was tightly pulled and sewn to form the squidgy ball at the top of the antennae.
There are no sharp ends protruding and the wire is designed to be coiled for added springy boingyness!

All faces and antennae have been handed over to the intrepid walkers to be sewn onto their bras. They can experiment with the optimum length and position of the antennae - for maximum impact and minimum impedance whilst walking!

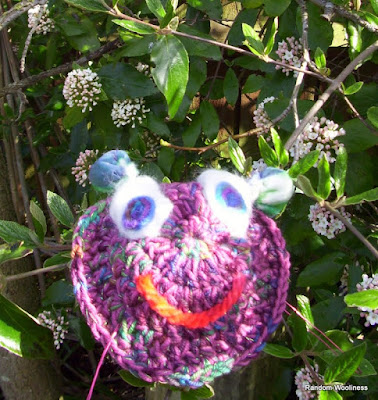
However before hand over there was a chance for them to visit another habitat


a spring garden


 in the sun


Its been great fun working together on  this exciting project -
I've just received this fab photo of furry funky aliens ready to roll!
 I am looking forward to seeing more photos on their next journey  - walking the walk in the moonlight in London!

 
Wishing my friends all the very best as they step out with fellow MoonWalkers,
raising money and awareness for this very worthwhile cause.

Monday, 6 May 2013

Secret Stash Busting!

Some good friends asked me to help them with a project recently - its for a great cause and all will be revealed in London at the weekend...but I can give some peeks at the work in progress!


More soon!

Thursday, 2 May 2013

Granny Pocket Heart Pattern

Here's a quick run through of my pattern for the Granny Pocket Hearts sent to heartsease.


It is written in UK terminology:
UK dc : US sc
UK tr : US dc

I have made the two parts in contrasting colours to show some of the steps more clearly.
It all starts with a humble straightforward 2 rounds granny square.
I use a five chain method like Tamara's pattern on Moogly.


Then another modified row is added to one side:
 slip stitch into the corner space;
chain 3, 1tr in corner space;
chain 1;
3tr in middle space;
chain 1;
finally 2 tr in next corner space.


Turn.
Chain 2;
6tr in middle stitch of 3 treble group of previous row;

Chain 2;
slip stitch into the top stitch of the 3chain of the previous row.

Finish off.


Make two of these half heart shapes,
one with a short end of wool and one with a long strand for sewing the two parts together.
Weave in the starting thread of yarn.
 Place the half with the short end at an angle with the wrong side up.


Place the second half on top, right side up, with the long tail towards the right.
The points should line up.


Sew the two shapes together down towards the point and then up the other side
(I have used a tapestry needle and an over stitch taking in both loops on both sides).
You may need to thread the strand through a couple of stitches before you start, as the place where you finished off is a little higher than the first stitches where the two shapes meet.

The next part probably sounds more complicated than it actually is - once the two parts are partly sewn it should happen naturally  - but here goes!
The third edge to be sewn is where the side edge of the top shape (multi-coloured) meets the top edge of the second granny round of the bottom shape (pink).
The modified extra granny row of the bottom shape stands above the join.


Some of the stitches are straight forward to join:


 for others I threaded through the treble loops of the row above:


Finish off at the end of the row and thread the end through the stitches you have just made, hiding the end inside one of the trebles.


Finally thread the short end from the first shape down the side seam towards the point.


The fourth side of each shape forms the opening!


So in summary (or the short version!)

Hook a two round granny square, ss into corner space then
Chain 3 1tr in corner space; ch1; 3tr in 2nd space; ch1; 2tr in 3rd space.
Turn
Ch2; 6 tr in middle tr of previous row; ch2; ss in top pf ch3 of previous row. FO.
Make 2 - one with a short final thread and one with a long one.
Weave in starting ends.
Place the half with short end wrong side up on the bottom, put the other half, right side up, on top lining up the points. Join two of the sides by sewing down to the point and up using a tapestry needle.
Stitch the third side, finish off and weave in ends.

Hope it all makes sense - my patterns are usually scribbled in my own code and tweaked as I go along!

I have already started making more for the heartsease project