Monday, 6 May 2013

Secret Stash Busting!

Some good friends asked me to help them with a project recently - its for a great cause and all will be revealed in London at the weekend...but I can give some peeks at the work in progress!


More soon!

Thursday, 2 May 2013

Granny Pocket Heart Pattern

Here's a quick run through of my pattern for the Granny Pocket Hearts sent to heartsease.


It is written in UK terminology:
UK dc : US sc
UK tr : US dc

I have made the two parts in contrasting colours to show some of the steps more clearly.
It all starts with a humble straightforward 2 rounds granny square.
I use a five chain method like Tamara's pattern on Moogly.


Then another modified row is added to one side:
 slip stitch into the corner space;
chain 3, 1tr in corner space;
chain 1;
3tr in middle space;
chain 1;
finally 2 tr in next corner space.


Turn.
Chain 2;
6tr in middle stitch of 3 treble group of previous row;

Chain 2;
slip stitch into the top stitch of the 3chain of the previous row.

Finish off.


Make two of these half heart shapes,
one with a short end of wool and one with a long strand for sewing the two parts together.
Weave in the starting thread of yarn.
 Place the half with the short end at an angle with the wrong side up.


Place the second half on top, right side up, with the long tail towards the right.
The points should line up.


Sew the two shapes together down towards the point and then up the other side
(I have used a tapestry needle and an over stitch taking in both loops on both sides).
You may need to thread the strand through a couple of stitches before you start, as the place where you finished off is a little higher than the first stitches where the two shapes meet.

The next part probably sounds more complicated than it actually is - once the two parts are partly sewn it should happen naturally  - but here goes!
The third edge to be sewn is where the side edge of the top shape (multi-coloured) meets the top edge of the second granny round of the bottom shape (pink).
The modified extra granny row of the bottom shape stands above the join.


Some of the stitches are straight forward to join:


 for others I threaded through the treble loops of the row above:


Finish off at the end of the row and thread the end through the stitches you have just made, hiding the end inside one of the trebles.


Finally thread the short end from the first shape down the side seam towards the point.


The fourth side of each shape forms the opening!


So in summary (or the short version!)

Hook a two round granny square, ss into corner space then
Chain 3 1tr in corner space; ch1; 3tr in 2nd space; ch1; 2tr in 3rd space.
Turn
Ch2; 6 tr in middle tr of previous row; ch2; ss in top pf ch3 of previous row. FO.
Make 2 - one with a short final thread and one with a long one.
Weave in starting ends.
Place the half with short end wrong side up on the bottom, put the other half, right side up, on top lining up the points. Join two of the sides by sewing down to the point and up using a tapestry needle.
Stitch the third side, finish off and weave in ends.

Hope it all makes sense - my patterns are usually scribbled in my own code and tweaked as I go along!

I have already started making more for the heartsease project

Thursday, 25 April 2013

Happy Scrumbler!

One of my New Year ambitions was to have a go at more freeform crochet. 
I recently came across a link to Tamsyn Gregory's funky scrumbled brooch tutorial and wow was I hooked! 
I love the zingy vibrant colours and oodles of textures in Tamsyn's blog and her tutorial was really easy to follow.

Here is my first scrumbled brooch


I am soooooo pleased with it, I love it..it sits where I can see its zingy colours..eventually I will wear it, but for now I just like to gaze at it!


It was such a pleasure to make too - just hooking anywhere, anytime, any colour, any width....I got lost in the colourful meandering!


When finished I had a lap full of various hooks and woolly ends - the whole area was surrounded by mounds of coloured strands, long strings and short ends! So engrossing!

Before tidying away another was flowing:


 This became the centre of a flower.
There will be many more scrumblings  - lots of ideas were sparked!

At 3g and 5g they are a tiny stash buster - but so much fun to go with the flow!

Stash buster totals for April:
Granny Pocket Hearts 155g
Spring Birds 32g + 3g 
Happy Birdy Bird 9g
Lily Squares 55g
Scrumblings 8g
 Total 262g
2013 total so far: 663+262 = 925g


Monday, 22 April 2013

Happy Birdy!

Meet the biggest bird to fly the nest!


He has extra plumage in the form of buttons..


one of the rounds was hooked in the back loops giving him a holey coat allowing for increased ventilation whilst flying and a more flamboyant decorative style !


A feathery 9g busted!

Happy Birdy L! x

Saturday, 20 April 2013

LILY squares

Part of my colourful stash has been hooked into 8inch squares 


parcelled and sent to Dianne for LILY, Love In the Language of Yarn,


where they will be combined with others to form blankets for Syrian refugees. 

You can read about more about it on  Dianne's blog.


Quite a few of my blogging friends are joining in too.


One of the squares included an experiment for a project I will be making with this colourful wool from my stash - 
 

now I have shown you all perhaps I will take the plunge and start it!

Total for 3 LILY granny squares -55g

Tuesday, 16 April 2013

Spring has sprung!

Spring certainly is in the air! The daffodils are cheerfully blooming, birds are tunefully singing,  the sky is a bright blue, pink and white blossom is brightening the branches and the blustery wind is much warmer! OOh and there's sunshine in abundance!
There are lots of spring birthdays in our family, so we have been a busy making, choosing, writing, wrapping  and celebrating!

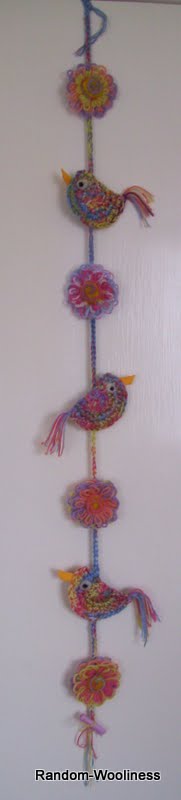
I picked these flowers made last year on my flower loom


and added a needlefelted middle to each.

Whenever a garland has been made to give away it hangs in our lounge until its ready to go - to keep it from getting squashed and to encourage it to hang straight!
However when it goes it takes its rainbow of colour with it!
Not being very good at making things for myself and after a very clever suggestion from Mr Random Wooliness a plan was hatched!


The flowers and birds were strung together with a note:


wishing Mr RW a Happy Birthday!
So now there is a very cheerful rainbow as a more permanent fixture brightening our room!


The birds are a bit bigger than most of the spring chickens and are all stash busters.
One camera shy bird flew the nest before pictures were taken.
Total big bird weight 32g.
The crocheted chain is also all stash wool 3g!
So 35g in all.

Lots of my creations involve hooking more than one strand of wool or yarn at a time. At the moment most of them include some of this beautiful rainbow from Sara's Texture Crafts.


Its so soft and makes eveything come up rainbows!

Sunday, 14 April 2013

Granny Pocket Hearts!

The stash busting challenge is proving great fun! My woolly storage facilities are becoming slimmer, my creative juices are flowing, and my inspiration banks are being re-charged at very regular intervals with all the amazing ideas fellow busters are sharing.
It has also been fab to find out more about the great community of creators who knit and crochet for charities.
Linda has a link on her page that includes information about such charities.


Two of them captured my imagination - I will blog about my squares for LILY later this month - 
the other is hearstese.


Ruth and Belinda are encouraging people to make heart shaped bags for children supported by Kids company. 


I really admire their project and having excitedly read the knitting patterns I set about devising a crochet heart pattern made from my favourite item – a granny square!


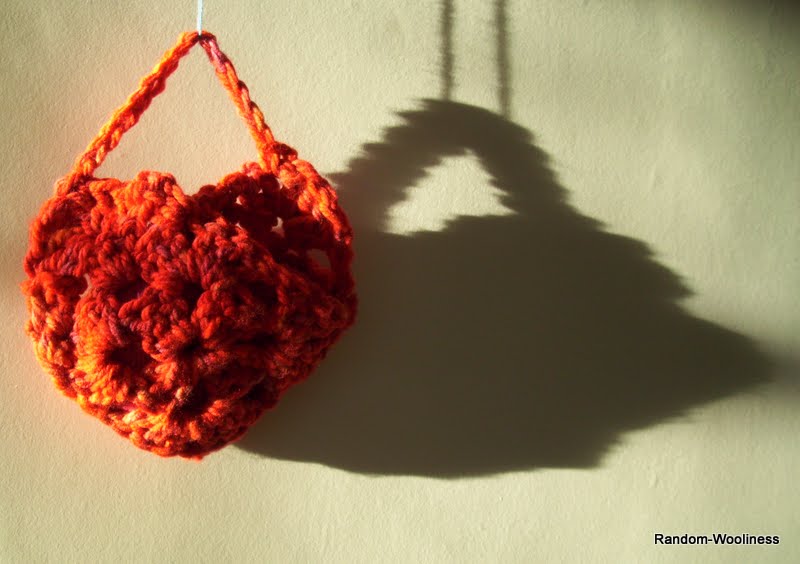
 I made one girly bag from chunky acrylic


 as the holes might let stuff out I stuffed the pocket with a fluffy bedsock!


Playing with shadows!
 I made another for a friend's daughter to accompany her birthday card.


Having a male bias in our household I thought the pattern lent itself to smaller hearts that can be stuffed into a pocket – pocket hearts! So I hooked a few in boyish colours too!


I packaged them off to Ruth and Belinda and received a very warm and appreciative e-mail of thanks. 
I intend to make more as they are easy to hook and construct, I hope to put a quick pattern up here soon too. 

Backs of the above fronts!

All the yarn I have used is from my stash and has come, so far, to heart warming a total of 155g